Introduction
The Boomi Atina JDE EnterpriseOne — Partner Connector requires an Atina JDE Microservice to work. This guide provides a streamlined, step-by-step walkthrough to get you up and running.
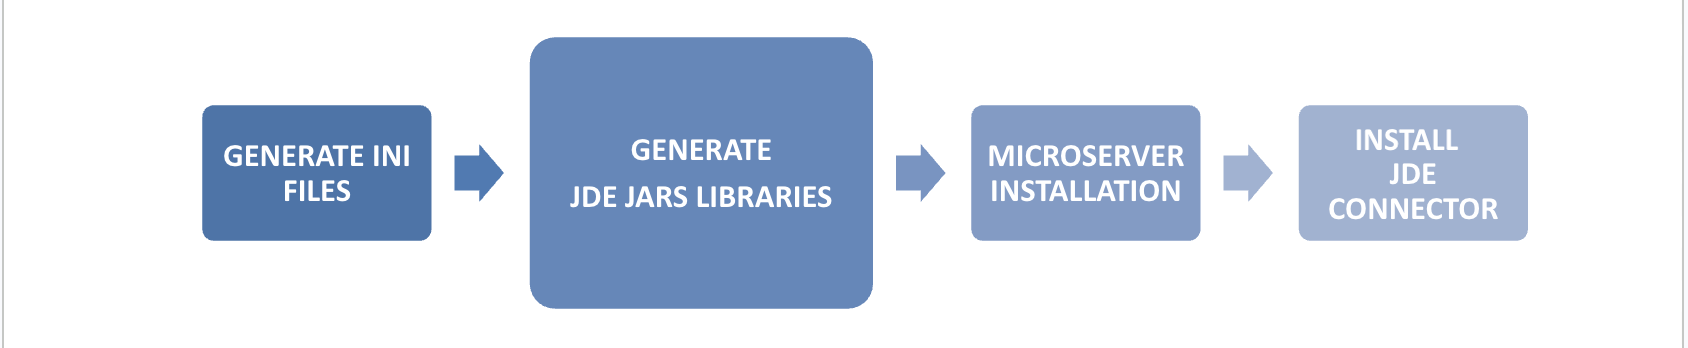
The setup consists of four main steps:

-
Generate JDE INI Files — Create the base configuration files from your JDE Server Manager.
-
Generate JAR Libraries — Package JD Edwards libraries into deployable JARs.
-
Microservice Installation — Deploy the Atina JDE Microservice using Docker.
-
Install Atina JDE EnterpriseOne — Partner Connector — Add the connector to your Boomi project.
Prerequisites
This setup requires:
-
Administrative access to your JDE environment and servers
-
JDE interoperability and network access configured for the microservice
-
OpenJDK 8 installed
-
Maven 3.8.1 or higher
-
Docker and Docker Compose
-
Network access and credentials to JDE Server Manager
-
Access to JDE Deployment Server
|
For detailed prerequisite information, see the Atina JDE Microservices Installation Guide. |
Step 1: Generate INI Configuration Files
The JDE Atina Generate Configuration Files Tool is a Java CLI application that generates base INI files. It retrieves all information from the JDE Enterprise Server Manager using its REST API. During execution, you will be asked to select the HTML Client instance for your environment.

Prerequisites for this step:
-
OpenJDK 8 installed
-
Network access and credentials to JDE Server Manager
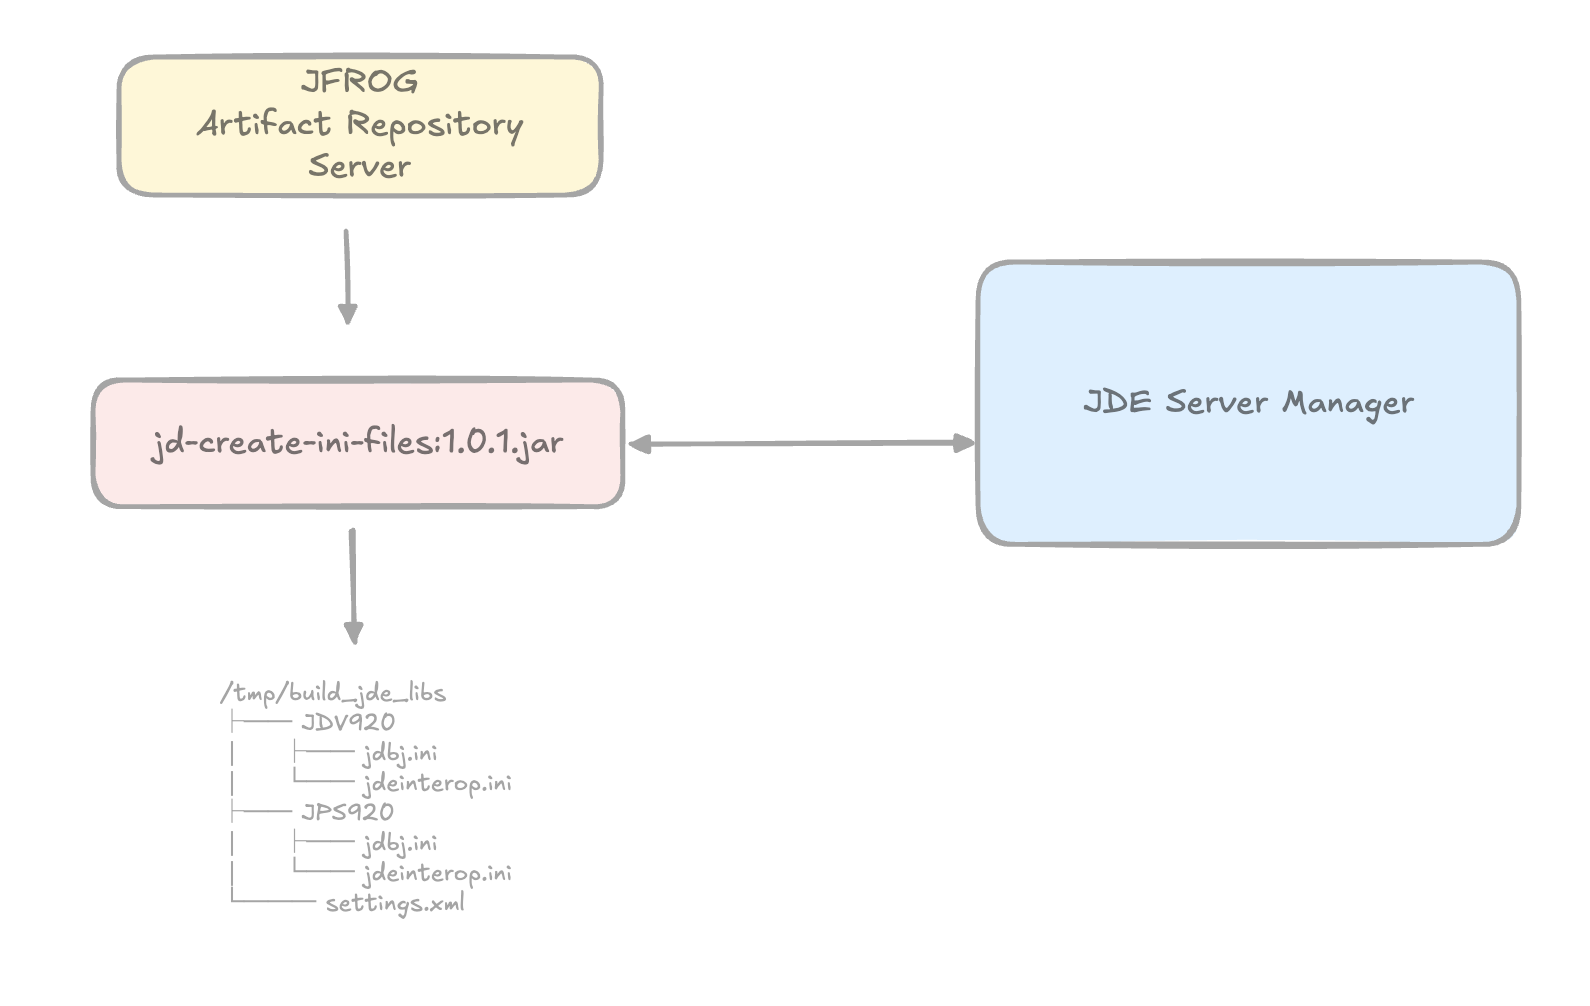
Step 1.1 - Download the Tool
Linux:
curl "https://jfrog.atina-connection.com/artifactory/libs-release-local/com/atina/jd-create-ini-files/1.0.0/jd-create-ini-files-1.0.1.jar" \
  -o jd-create-ini-files-1.0.1.jar
Windows PowerShell:
curl.exe "https://jfrog.atina-connection.com/artifactory/libs-release-local/com/atina/jd-create-ini-files/1.0.0/jd-create-ini-files-1.0.1.jar" `
  -o "jd-create-ini-files-1.0.1.jar"
Step 1.2 - Run the Tool
The tool is interactive — you will be asked to pick the HTML instance:
java -jar jd-create-ini-files-1.0.1.jar \
  -u <jde_admin> \
  -p <password> \
  -s http://<server-manager-host>:8999/manage \
  -e <ENV ex. JDV920>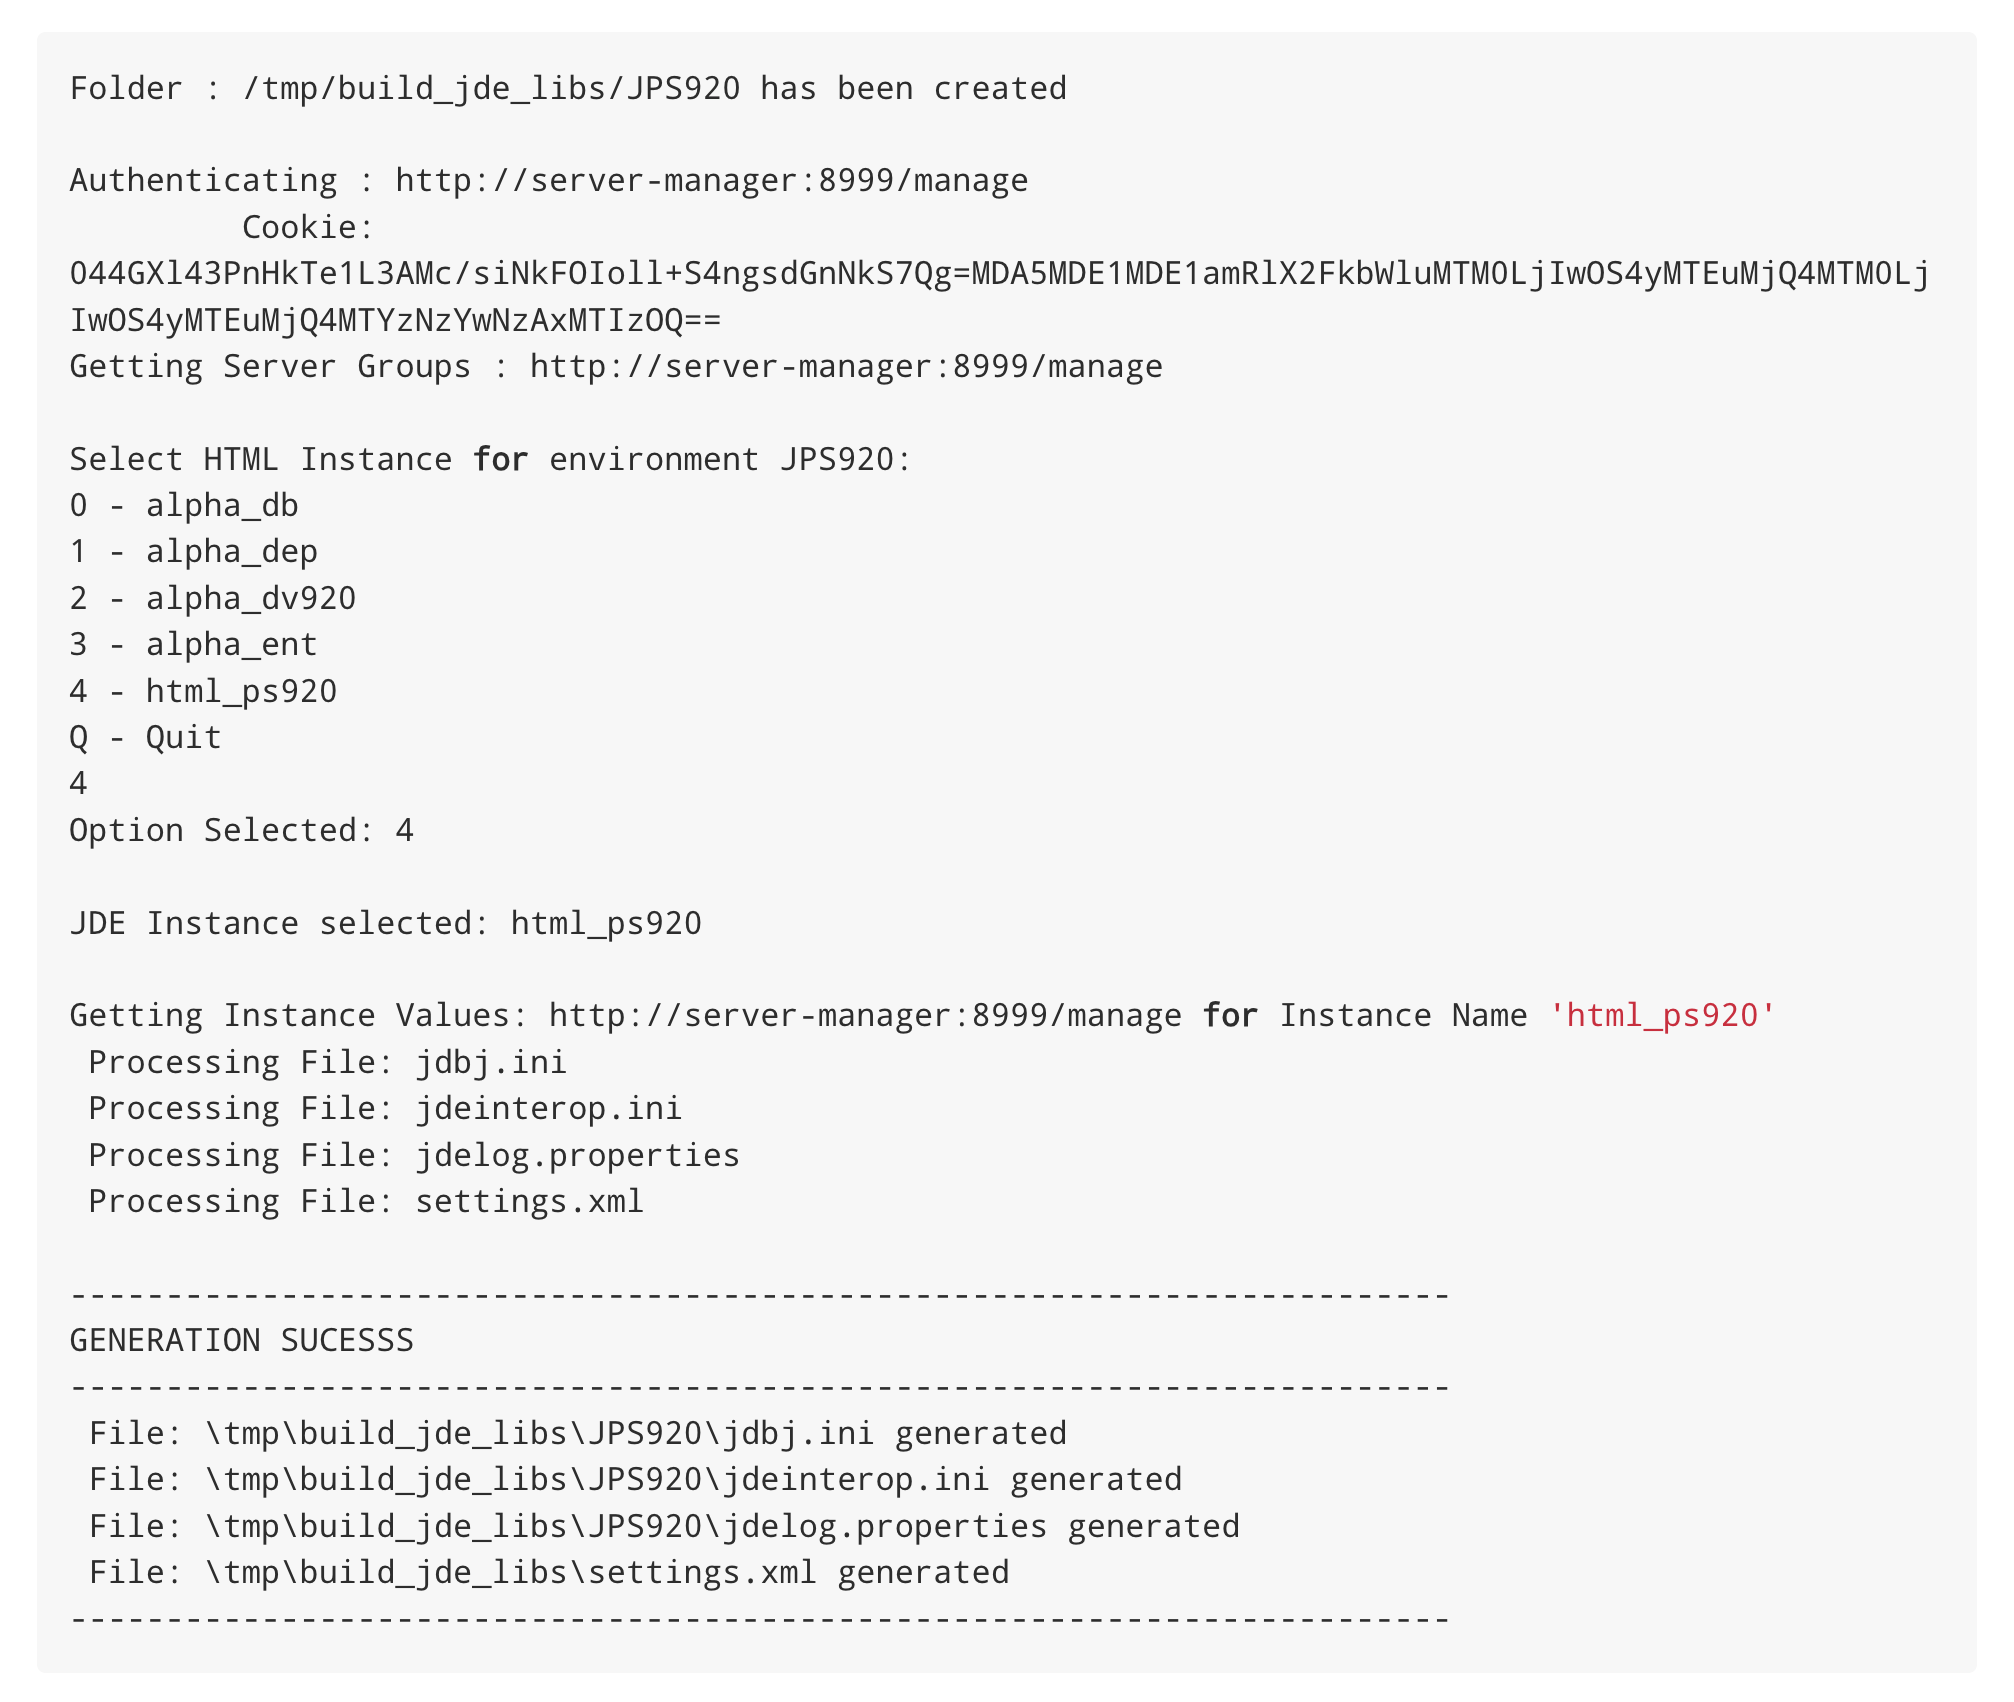
|
Review the generated INI files to verify that the values are correct. |
Manual Alternative
If you encounter any issues retrieving information from the servers, you can generate the INI files manually by obtaining the values directly from the JDE Server Manager. The video below shows where to find each value in the Server Manager interface.
First, run the following command to generate the folder structure with template INI files that you will need to update manually:
java -jar jd-create-ini-files-1.0.1.jar \
  -e JDV920 \
  -m Y \
  -f /tmp/build_jde_libs
This creates the directory structure with base INI files. You must then update these files with the correct values obtained from the Server Manager.
Version: 1.0.1
Running with migration options
-----------------------------------------------------------
Creating environment folder...
Folder : /tmp/demo/JDV920 has been cleaned
 Processing File: jdbj.ini
processIniFile JDBJ: File: /tmp/demo/JDV920/jdbj.ini generated
 Processing File: jdeinterop.ini
processIniFile INTEROP: File: /tmp/demo/JDV920/jdeinterop.ini generated
 Processing File: jdelog.properties
processIniFile JDELOG: File: /tmp/demo/JDV920/jdelog.properties generated
-----------------------------------------------------------
Creating Setting XML File...
 Processing File: settings.xml
 File: /tmp/demo/settings.xml generated
|
For more details, see the section JDE Atina Generate Configuration Files Tool in the Atina JDE Microservices Installation Guide. |
Step 2: Generate JAR Libraries
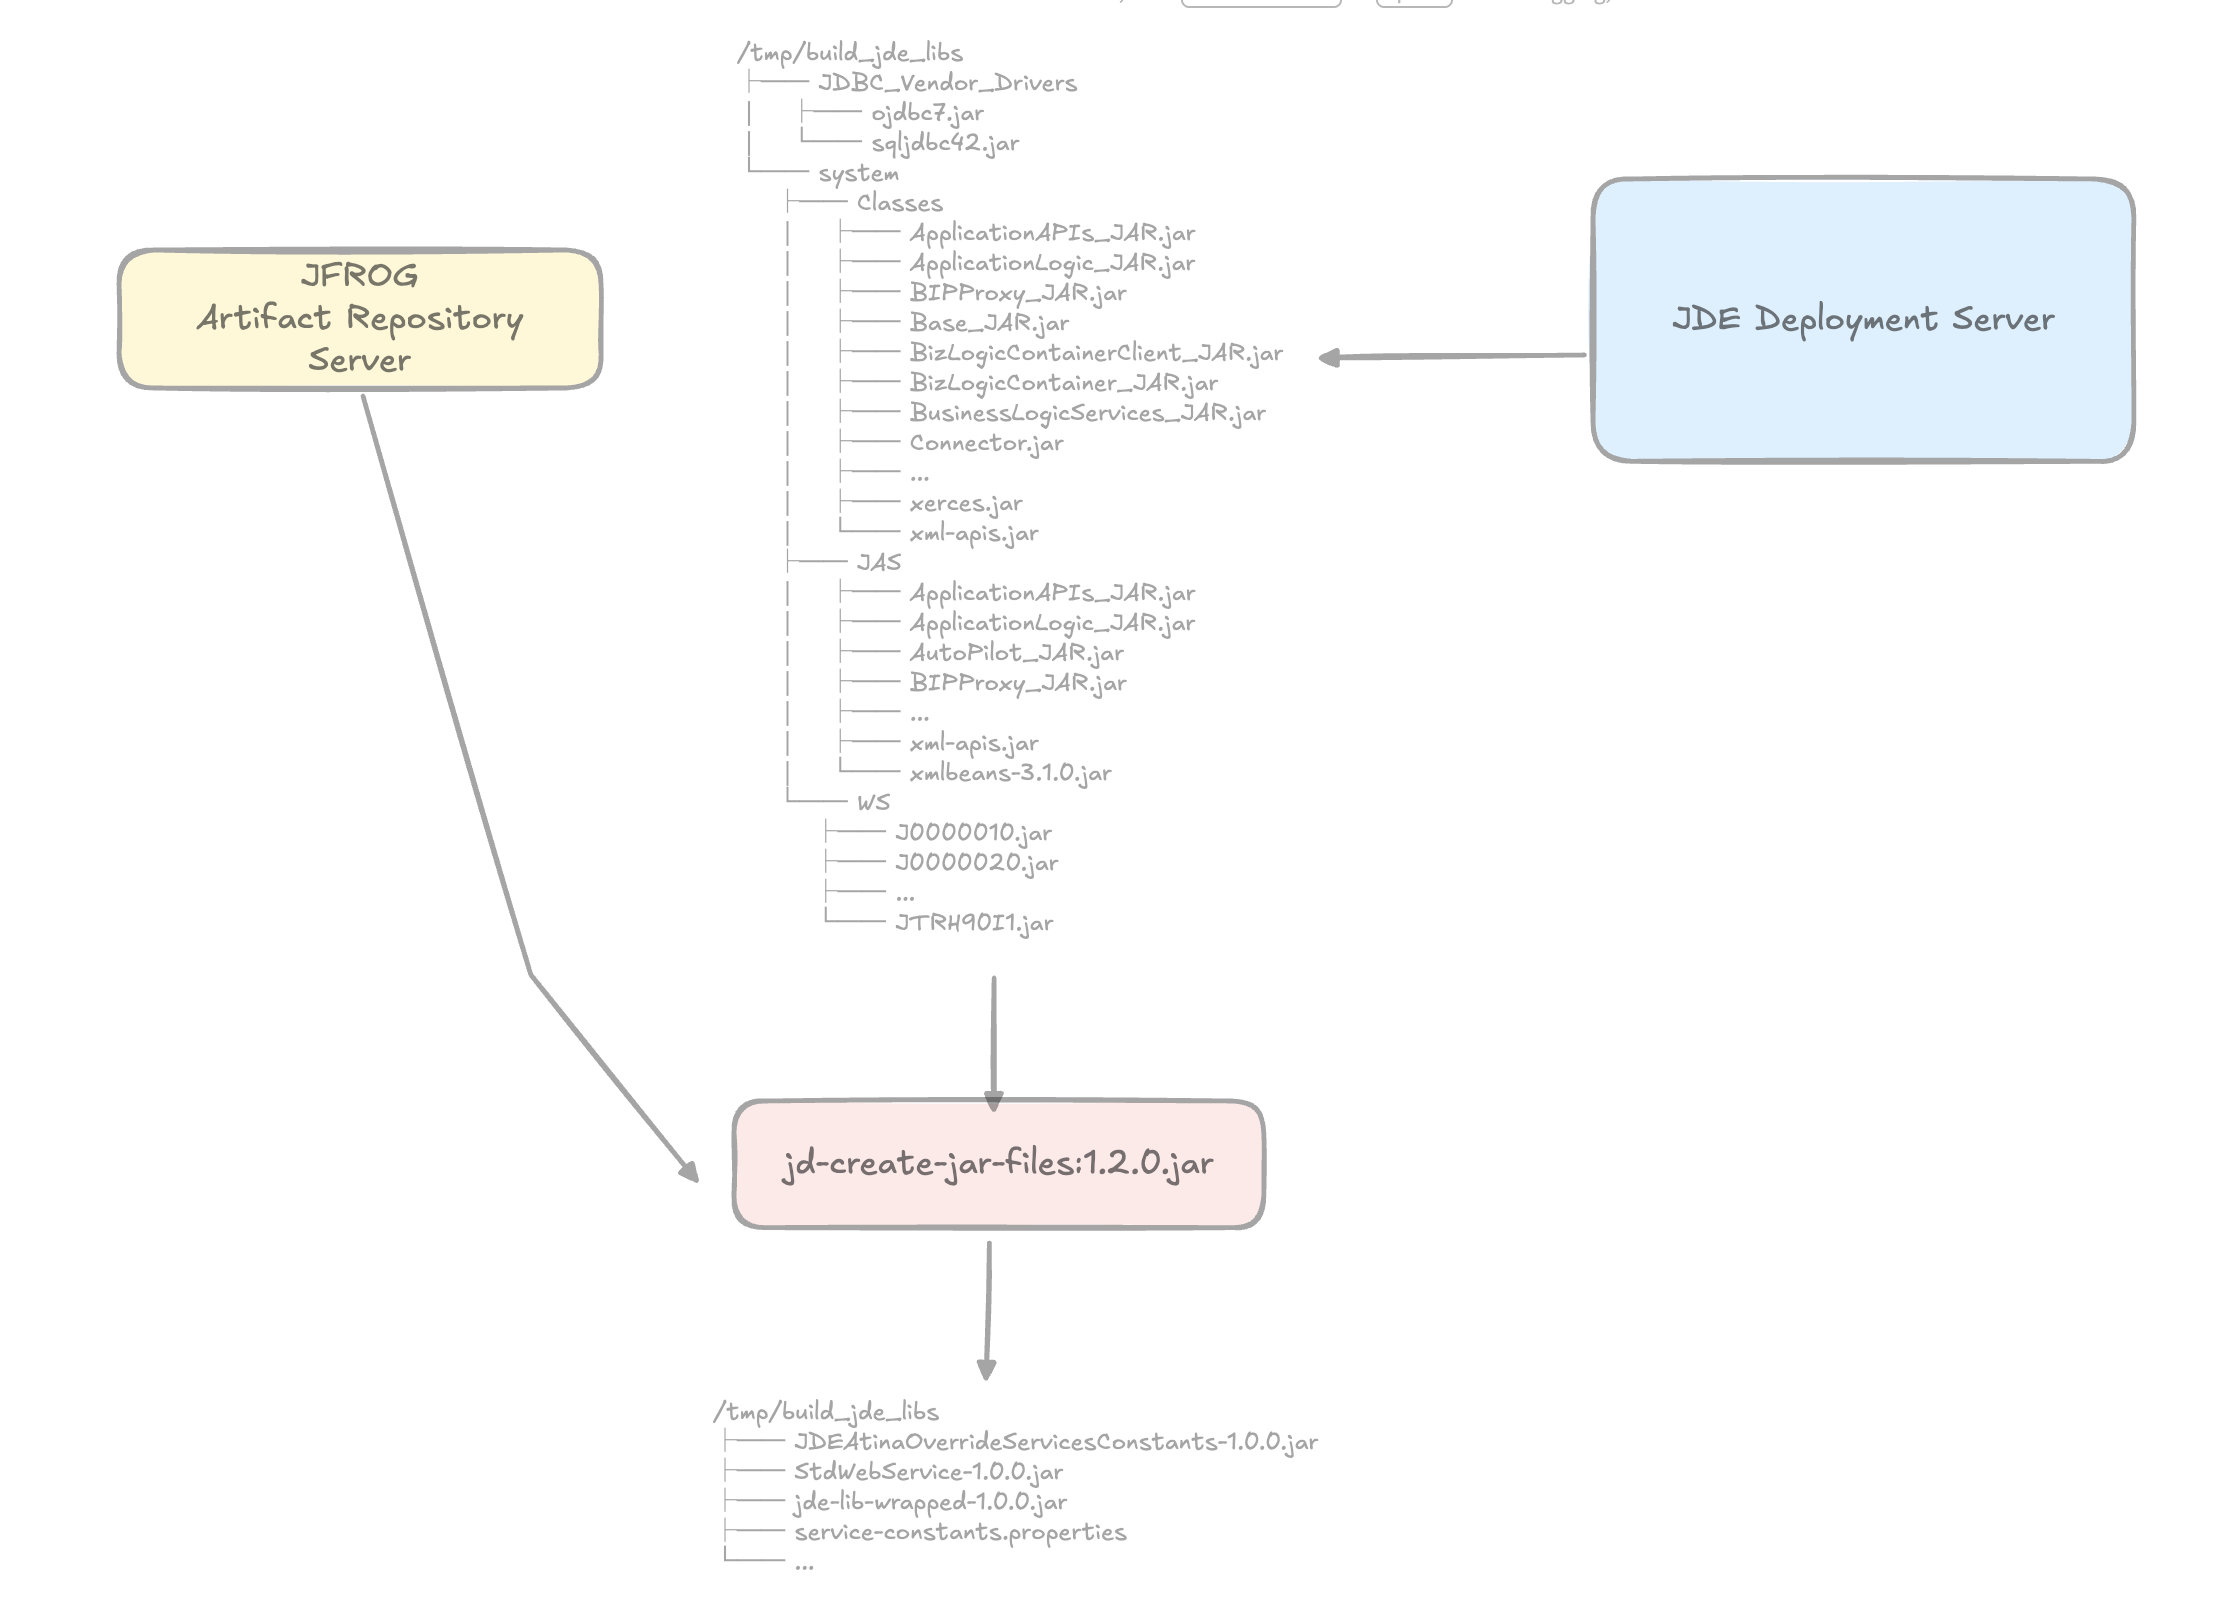
This tool packages the JD Edwards libraries into deployable JAR files required by the Atina JDE Microservice. It simplifies dependency management and ensures that all necessary classes are available at runtime.
This step is now performed through the JDE Atina Build Manager, a web-based tool available at builder.atina-connection.com. There is no need to download a CLI tool, create a folder structure, or configure a local Maven repository — you upload your Deployment Server files through the browser and the tool builds the artifacts for you.
Prerequisites for this step:
-
Access and credentials to JDE Deployment Server
The tool will generate the following artifacts:
-
JDEAtinaOverrideServicesConstants-1.0.0.jar— Provides local override of web service properties, avoiding the need to modify JDE configuration. -
service-constants.properties— Contains configuration properties for the microservice. -
jde-lib-wrapped-1.0.0.jar— Bundles the core JD Edwards interoperability libraries required for integration. -
StdWebService-1.0.0.jar— Includes wrappers for standard JD Edwards web services.
If you are a new customer, click New Customer on the Build Manager home page, enter your company name and corporate email, and you will receive access instructions by email once approved.
For the full step-by-step guide — requesting access, uploading your Deployment Server files, running the build, and downloading the generated artifacts — see the JDE Atina Build Manager - User Guide.
|
For more details, see the section JDE Atina Generate Jars Files Tool in the Atina JDE Microservices Installation Guide. |
Step 3: Microservice Installation
This section explains how to deploy the Atina JDE Microservice using Docker and Docker Compose. You will configure environment variables, initialize the container, and run a basic test to validate connectivity with JD Edwards.

Prerequisites for this step:
-
OpenJDK 8 installed
-
Maven 3.8.1 or higher
-
Docker
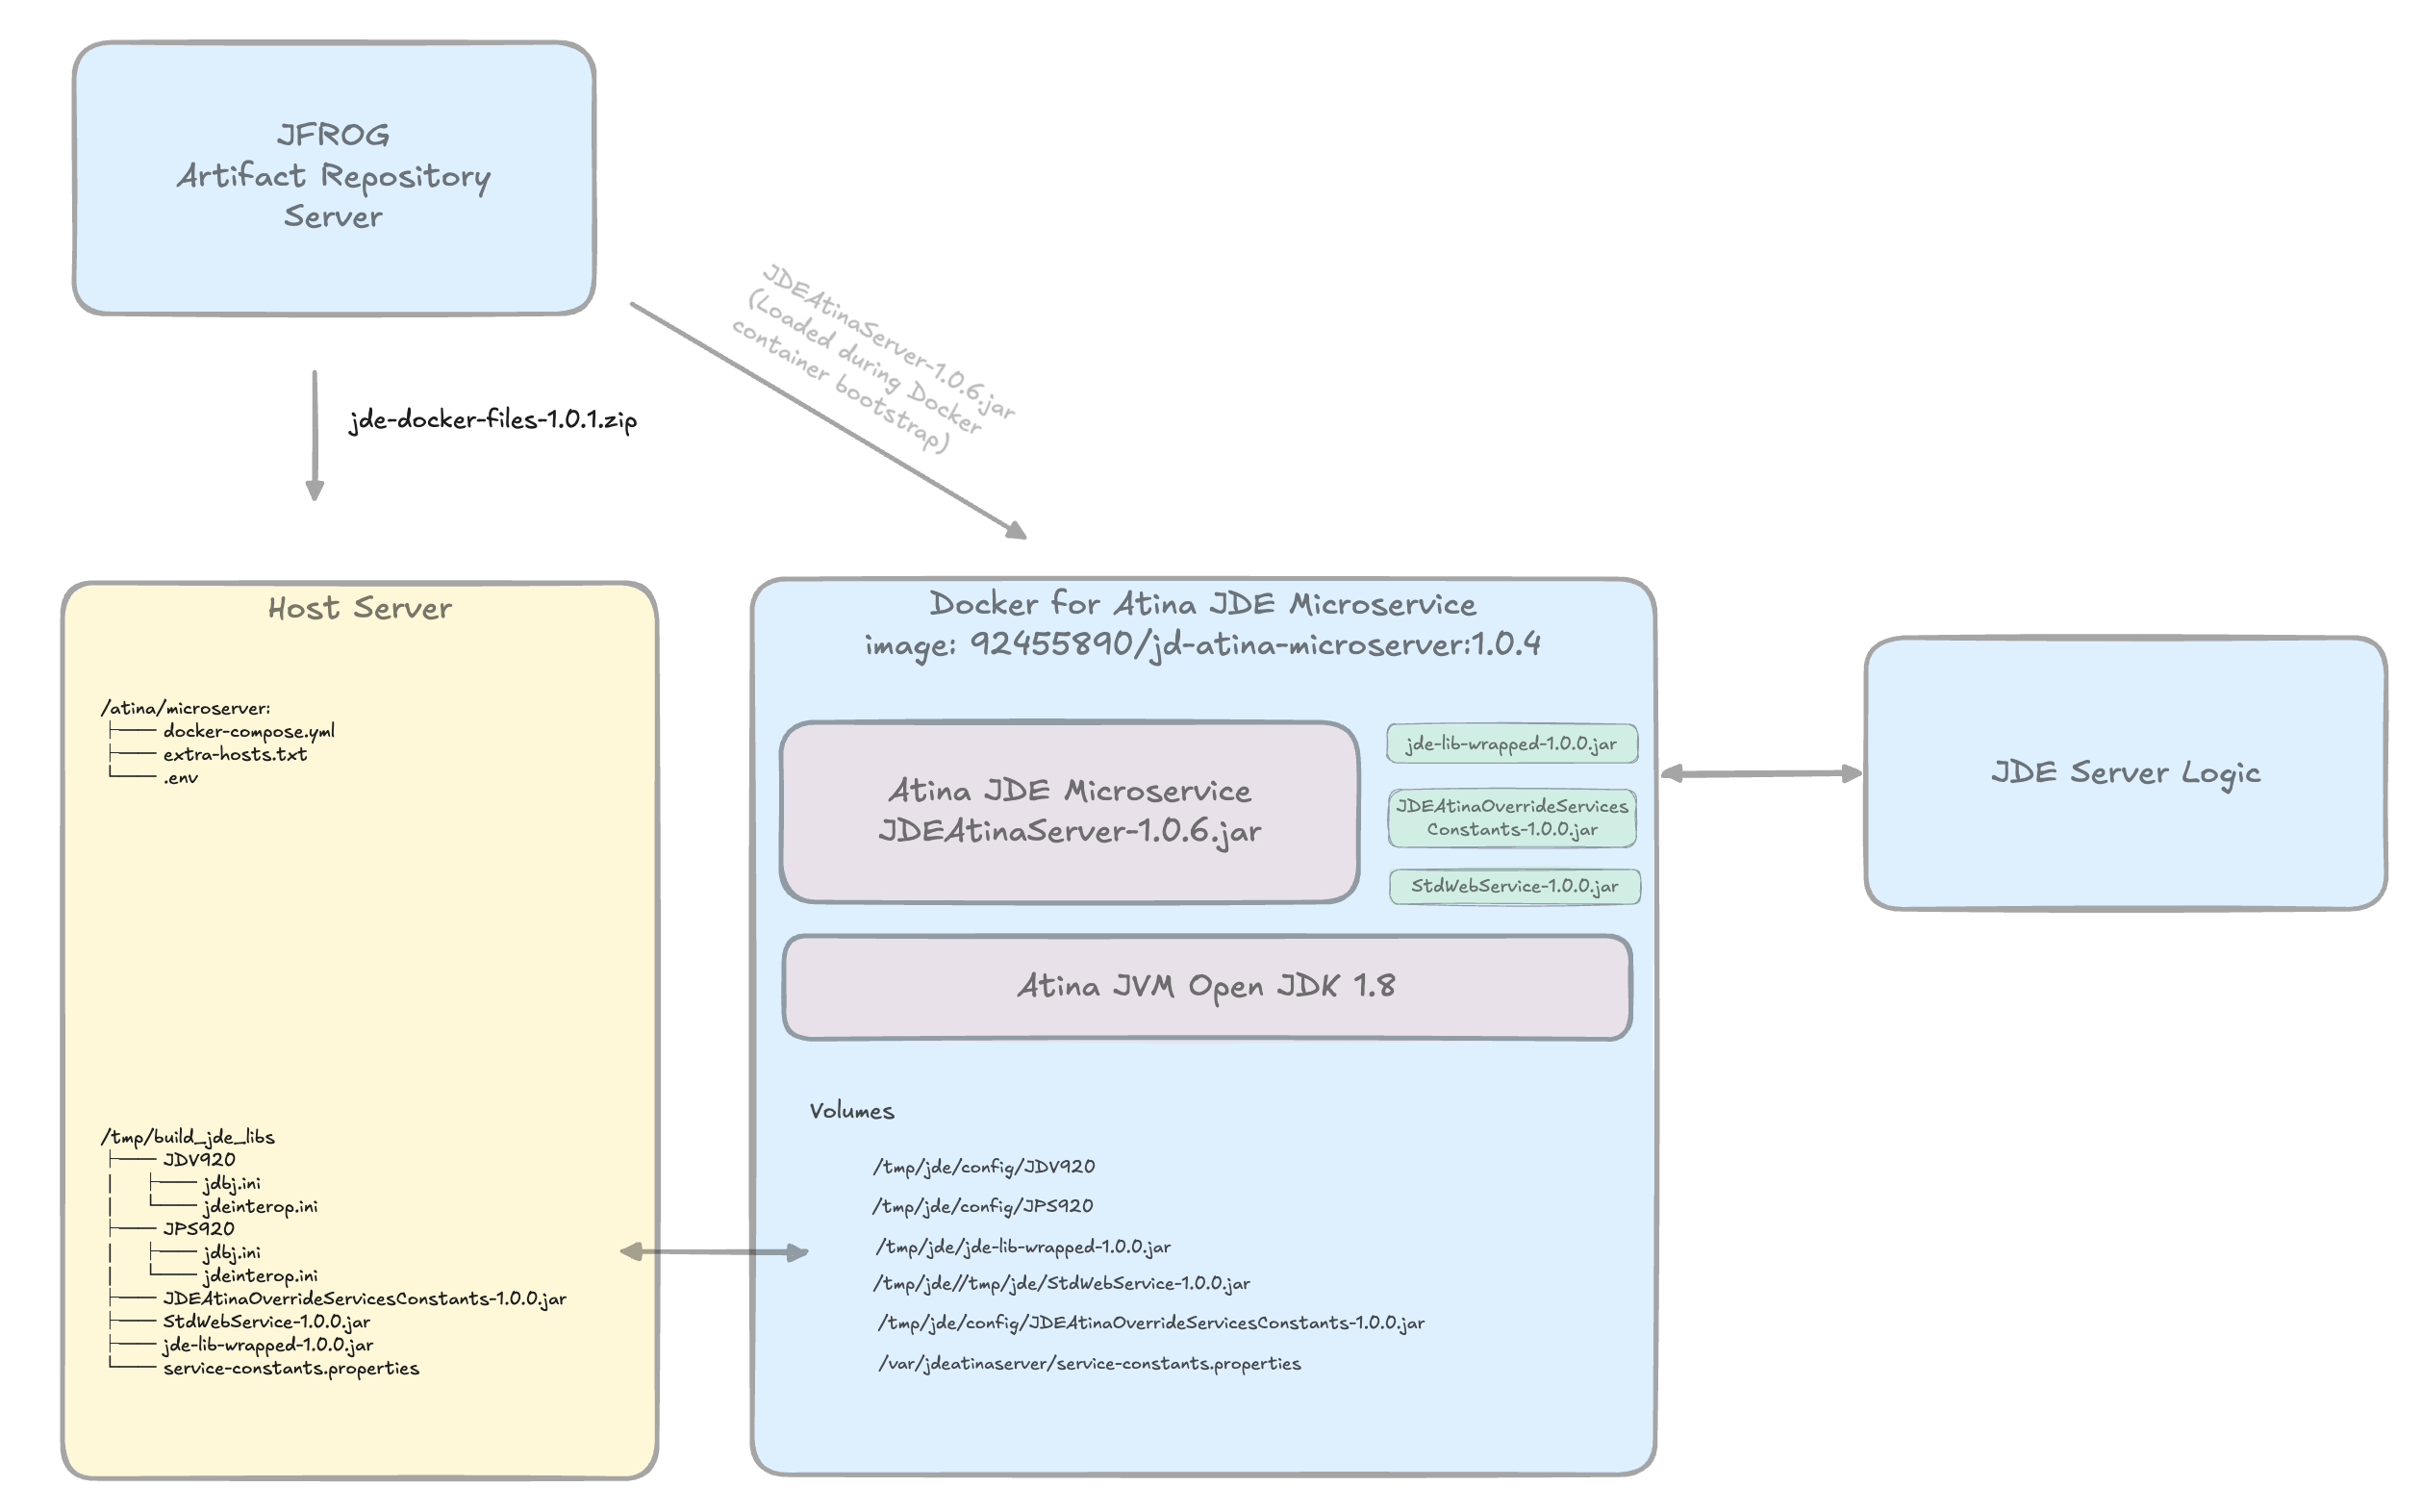
Step 3.1 - Download Docker Compose Files
curl https://jfrog.atina-connection.com/artifactory/libs-release-local/com/acqua/jde-docker-files/1.0.1/jde-docker-files-1.0.1.zip --output jd-docker-files.zipUnzip:
unzip jd-docker-files.zipStep 3.2 - Configure Environment Variables
Edit the .env file and set the values according to your infrastructure.
Microservice settings:
JDE_MICROSERVER_IP=172.28.0.2
JDE_MICROSERVER_PORT=8077
JDE_MICROSERVER_DEBUG_PORT=5005
JDE_MICROSERVER_CODE=demo-
JDE_MICROSERVER_IP: Informational value used to indicate the IP address through which the microservice is exposed. This value does not affect the internal runtime configuration of the service. -
JDE_MICROSERVER_PORT: Port exposed by the microservice. Change this value if you need to use a different port, for example to avoid conflicts with other services. -
JDE_MICROSERVER_DEBUG_PORT: Debug port exposed by the microservice for remote debugging. -
JDE_MICROSERVER_CODE: Unique license code assigned to the customer by Atina. This value is mandatory for the service to start correctly.
|
The database name must match the Data Source name defined in the JDE OCM. Incorrect names may lead to failed connections or incorrect environment targeting. |
Hostname resolution inside the container (extra-hosts file):
The microservice supports injecting host mappings into the container’s /etc/hosts using a mounted file. This is useful when the container needs to reach JDE Enterprise Servers and Database hosts that are not resolvable via Docker’s default DNS.
Edit extra-hosts.txt file with the required hostname-to-IP mappings:
# IP            HOSTNAME
138.91.73.161   JDE-ALPHA-ENT
65.52.119.187   JDE-ALPHA-SQL
# END HOSTS
Add the following to your .env:
HOST_EXTRA_HOSTS_FILE=/absolute/path/to/extra-hosts.txt|
The hosts file must use Unix line endings (LF), not Windows CRLF. Ensure it ends with |
Volume settings:
Volume_DataLogs=/home/jde/data/logs
Volume_JDETmp=/home/jde/data/tmp
Volume_JDELog=/home/jde/data/jdelog
JDE_LIBS_ROOT=/tmp/build_jde_libs-
Volume_DataLogs: General microservice logs. -
Volume_JDETmp: Temporary files. -
Volume_JDELog: Logs specific to JDE libraries. -
JDE_LIBS_ROOT: Path to the folder containing the generated JDE JARs and configuration files. This is used by Docker Compose to mount the artifacts as volumes into the container, replacing the need for manualdocker cpcommands.
Create the volume directories:
mkdir -p /home/jde/data/logs \
         /home/jde/data/tmp \
         /home/jde/data/jdelog
Step 3.3 - Configure Volume Mounts in docker-compose.yml
The container reads JDE configuration and library files from host-mounted volumes. Update your docker-compose.yml to mount the required files:
services:
  jd-atina-microserver:
    volumes:
      # JDE environment configuration folders
      - ${JDE_LIBS_ROOT}/JDV920:/tmp/jde/config/JDV920:ro
      - ${JDE_LIBS_ROOT}/JPS920:/tmp/jde/config/JPS920:ro

      # JDE library JARs
      - ${JDE_LIBS_ROOT}/jde-lib-wrapped-1.0.0.jar:/tmp/jde/jde-lib-wrapped-1.0.0.jar
      - ${JDE_LIBS_ROOT}/StdWebService-1.0.0.jar:/tmp/jde/StdWebService-1.0.0.jar
      - ${JDE_LIBS_ROOT}/JDEAtinaOverrideServicesConstants-1.0.0.jar:/tmp/jde/JDEAtinaOverrideServicesConstants-1.0.0.jar

      # Service configuration
- ${JDE_LIBS_ROOT}/service-constants.properties:/var/jdeatinaserver/service-constants.properties:ro|
The |
Step 3.4 - Start the Container
docker compose --env-file .env up -d --force-recreate|
Use: docker compose down -v to stop and remove the container along with its volumes for any changes to take effect on the next startup. |
Step 3.5 - Check the Microservice Startup Log
Verify the startup log:
docker exec -it jd-atina-microserver cat /tmp/start.log-JAVA Image--------------------------------------------
javaJDKImage: j2sdk-image-x86_64-u322-b04-20221122.tar.bz2
DEBUG_ACTIVO: false
-SERVICE--------------------------------------------
Name: 172.28.0.2
Port: 8077
-MOCKING------------------------------------------
JDE_MICROSERVER_MOCKING: 0
-REPOSITORY-----------------------------------------
Customer: https://jfrog.atina-connection.com/artifactory/libs-release
Atina: https://jfrog.atina-connection.com/artifactory/libs-release
-ATINA services------------------------------------------
JDEAtinaServer Version 1.0.6
JDEAtinaOverrideServicesConstants Version 1.0.0
-LIBRARIES------------------------------------------
StdWebService Version 1.0.0
jde-lib-wrapped Version 1.0.0
-LICENSE--------------------------------------------
Code: demo
-MICROSERVER----------------------------------------
JDE_MICROSERVER_TOKEN_EXPIRATION: 3000000
JDE_MICROSERVER_MOCKING: 0
----------------------------------------------------
-JVM---------------------------------------------
JDE_JAVA_XMS: 2G
JDE_JAVA_XMX: 4G
JDE_JAVA_HEAP_DUMP_ON_OOM: true
JDE_JAVA_HEAP_DUMP_PATH: /tmp/jde/jvm-dumps
JDE_JAVA_ERROR_FILE: /tmp/jde/jvm-dumps/hs_err_pid%p.log
JDE_JAVA_EXTRA_OPTS:
JAVA_OPTS: -Xms2G -Xmx4G -XX:+HeapDumpOnOutOfMemoryError -XX:HeapDumpPath=/tmp/jde/jvm-dumps -XX:ErrorFile=/tmp/jde/jvm-dumps/hs_err_pid%p.log
----------------------------------------------------
ADDITIONAL SCRIPT: /etc/hosts entries
Added host: 52.183.27.36 JDE-ALPHA-ENT
Added host: 40.125.78.136 JDE-ALPHA-SQL
Cat /etc/hosts:
127.0.0.1 localhost
::1 localhost ip6-localhost ip6-loopback
fe00:: ip6-localnet
ff00:: ip6-mcastprefix
ff02::1 ip6-allnodes
ff02::2 ip6-allrouters
172.19.0.2 1d064a6ec7e2
52.183.27.36 JDE-ALPHA-ENT
40.125.78.136 JDE-ALPHA-SQL
----------------------------------------------------
----------------------------------------------------
Check log cat /tmp/jde/JDEConnectorServerLog/jde_atina_server_2026-05-14.0.log
Debug false
Debug 5005
------------------------------------------------------------------------------------
Starting....:
------------------------------------------------------------------------------------Check the Docker logs to confirm the microservice started correctly:
docker logs jd-atina-microserverJDERestServer - *------------------------------------------------------*
JDERestServer - Working Directory: /var/jdeatinaserver
JDERestServer - Tmp Directory: /tmp/jde
JDERestServer - JDE Connector Version: 1.0.6
JDERestServer - JDE Atina Override Services Constants: 1.0.0
JDERestServer - ------------------------------------------------------
JDERestServer - Configuration:
JDERestServer - SERVICE:
JDERestServer - IP = [172.28.0.2]
JDERestServer - Port = [8077]
JDERestServer - Local IP = [0.0.0.0]
JDERestServer - Token Expirtation = [3000000]
JDERestServer - Mocking = [false]
JDERestServer - Last Build = [2020-08-31-004]
JDERestServer - Last Build = [2026-05-13 13:40]
JEConnectorServer - Cleanning Temporal Folder: /tmp/jde
JDEConnectorServer - Clean Done
JDEConnectorServer - Created SessionsCleanerTask for 60 minutes
JDEConnectorServer - Created CleannerUtil for 60 minutes
JDEConnectorServer - Iniciando JDE Service Impl con JAVA [1, 8, 0-jdk8u322-b04]
JDERestServer - *---------------------------------------*
JDERestServer - * Starting JDE Microservice 1.0.6 *
JDERestServer - * JDE Microservice started! *
JDERestServer - *---------------------------------------*Step 3.6 - Validate the Microservice Deployment
Once the microservice is deployed and running, you can use the JD Atina Check Microservice Tool to validate that it can connect to JD Edwards and invoke a basic web service.
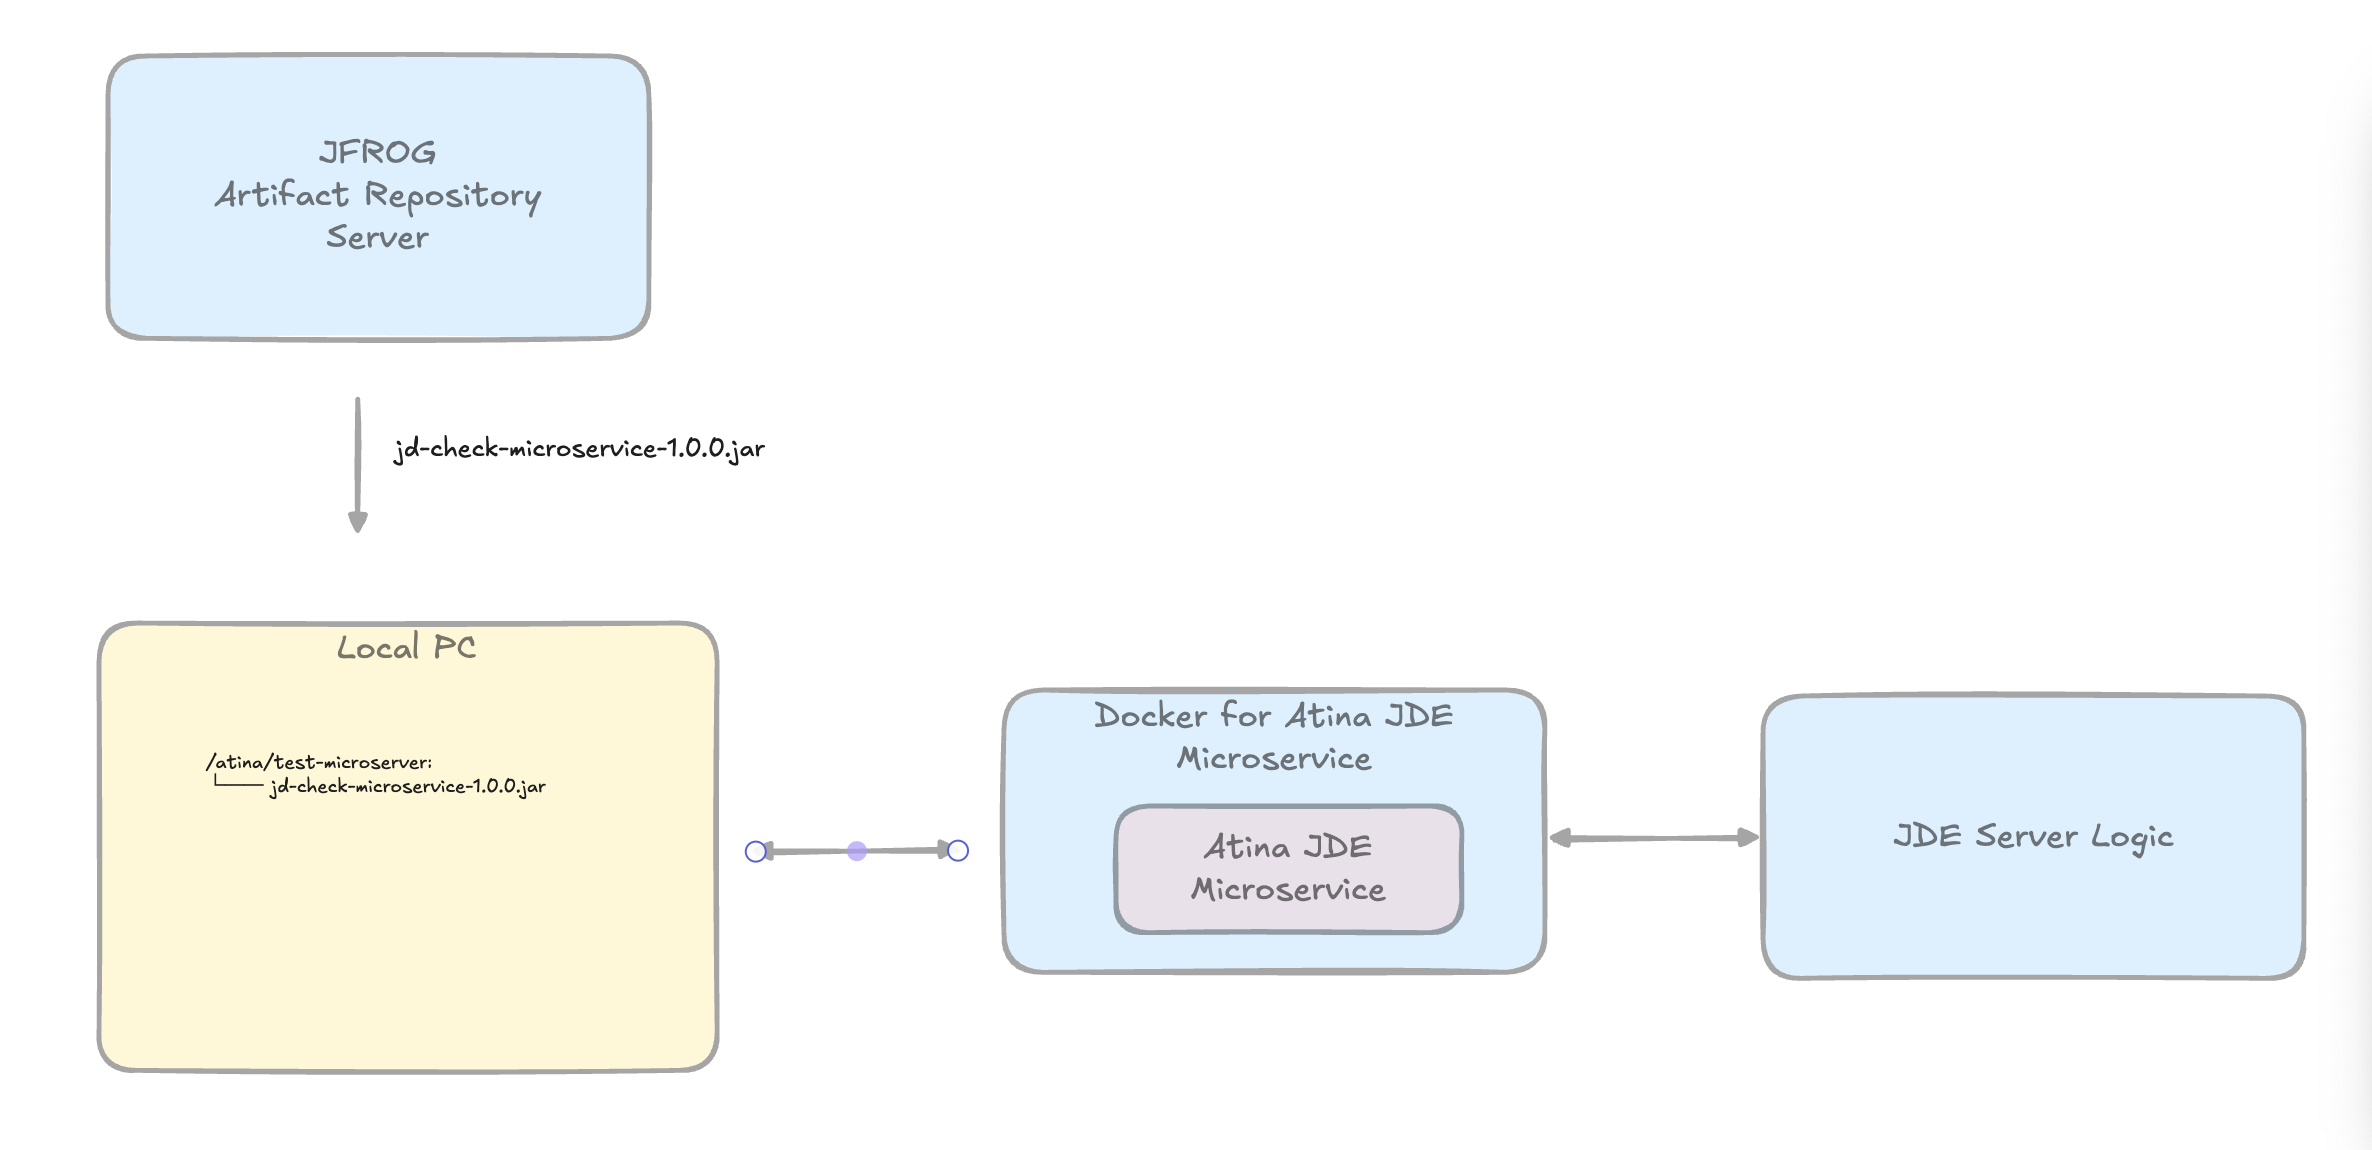
Download the Check Tool:
curl https://jfrog.atina-connection.com/artifactory/libs-release-local/com/atina/jd-check-microservice/1.0.0/jd-check-microservice-1.0.0.jar \
  --output jd-check-microservice-1.0.0.jar
Run the test:
java -jar jd-check-microservice-1.0.0.jar \
  -u JDE \
  -w XXXXXX \
  -e JDV920 \
  -r "*ALL" \
  -s localhost \
  -p 8077 \
  -m TestLoggindAndGetAddressBookWS \
  -a 28 \
-n "Prueba - Argentina - 28 "-
-a: Address Book number of an existing record in your JDE environment. -
-n: Name of the Address Book record corresponding to the number specified in-a.
If everything is correctly configured, you will see output like the following:
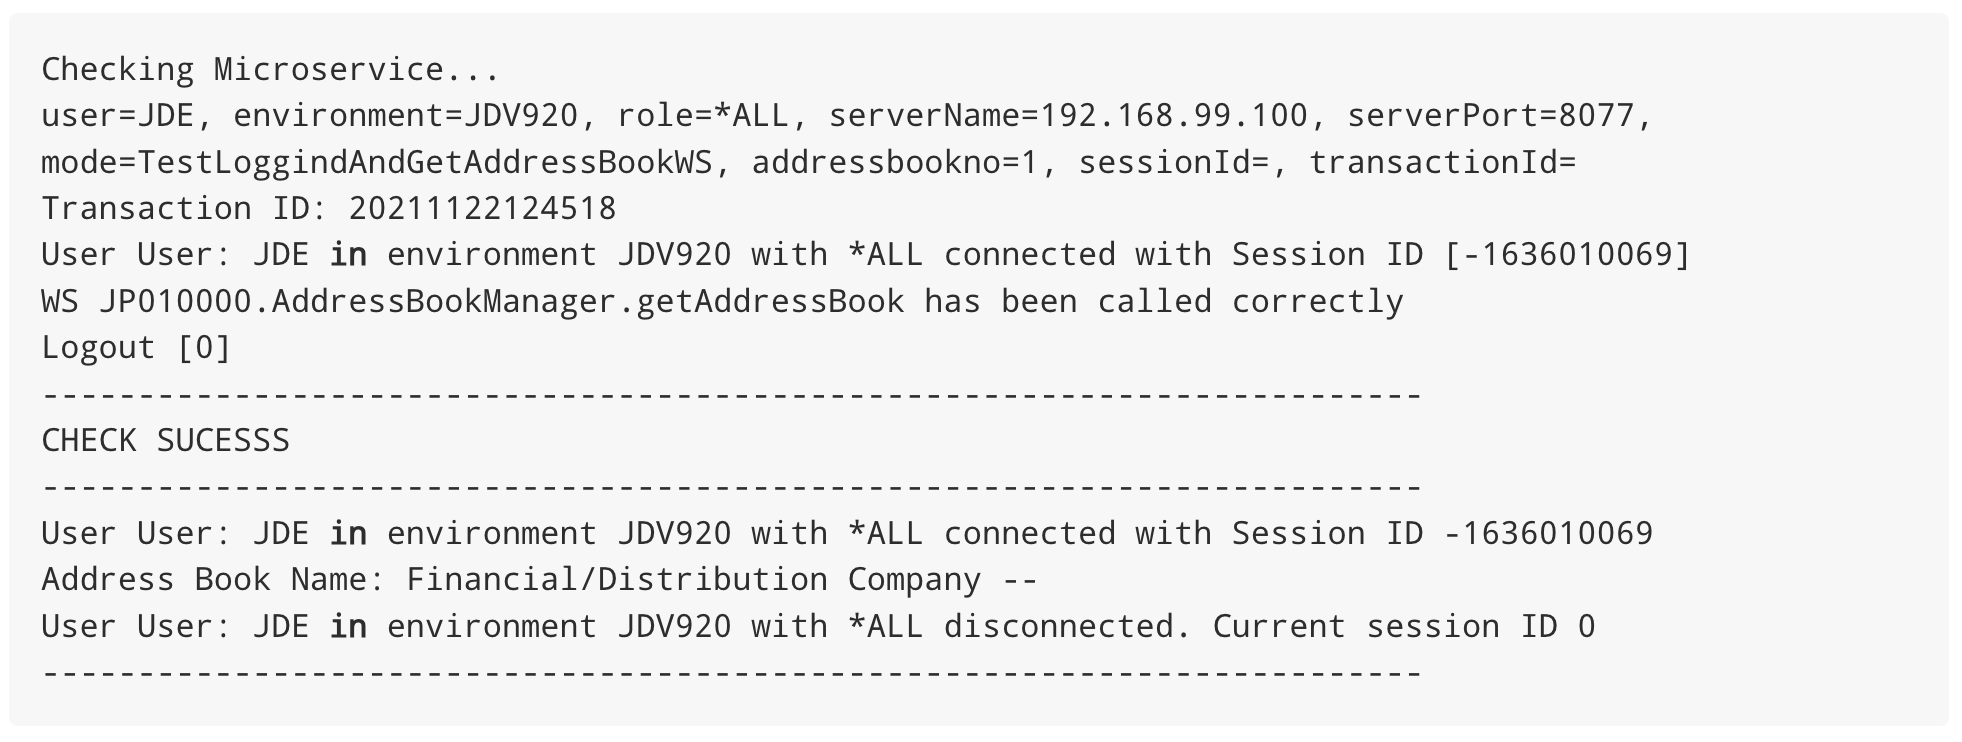
|
For more details, see the section JDE Atina microservices - Installation in the Atina JDE Microservices Installation Guide. |
Step 4: Install Atina JDE EnterpriseOne — Partner Connector

|
For more details, see the section Preliminary Setup in the Atina JDE Connector User Guide. |